

How To Change Guitar Chords Fast: Easy Tricks for Beginner Guitarists
Author: Brett Heenan
As a beginner guitar player, one of the most difficult hurdles to overcome is that of transition between chords. We learn the chords to our favourite songs or a new complex chord shape, but when it comes to making music with them, our lack of muscle memory and dexterity inhibits us from stringing these chords together in a meaningful and comprehensive manner.
The biggest problem I see with new players is that they struggle to use one finger as a guide to bring the other fingers into place when trying to grab a chord.

I strongly recommend beginner guitar players to use the Uberchord app (click for free download) for practicing chord progressions and chord changes, and use the real-time feedback to improve your playing skills. While, I’ll help you expedite the process of grabbing chords confidently on the neck and get you on your way to playing along expertly with your favourite band, or better yet, running a band of your own.
The biggest problem I see with new players is that they struggle to use one finger as a guide to bring the other fingers into place when trying to grab a chord. They eventually get the shape together on the fretboard, but by that time the chord has already passed and it’s time for the next one.
The first key to playing chords with confidence and fluidity is to GO SLOW.
This is one of the hardest things to do as a new player. We want to play everything perfectly right away, but in doing so, we form bad habits and extraneous movements. Check out our earlier post on avoiding some very common beginner guitar mistakes.
Table of Contents
The Exercises
We will be using a chord progression of C, D & G.
Step 1 – Let’s just take a simple C major chord to begin with.

Even if you’re new to guitar, you’re probably familiar with this shape as it’s one of the first chords any guitar player learns. Interestingly though, it’s one that I see many beginners struggle with over and over again.
Step 2 – Start by getting this shape on the fretboard, as you can see in the gif image on the right.
This may seem trivial, but getting the feel of a chord shape in your hand is the most important step to being able to come back to it confidently. Make sure you hold it there for at least 10 seconds. Feel the string indentations being formed on your fingertips.
Step 3 – After ten seconds, pull your hand away from the fretboard slowly and bring it down to rest on your left thigh (right thigh if you’re playing left handed).
Step 4 – Slowly bring your hand back up to the fretboard. Your fingers should already be forming the chord shape on the way up.
When you’re a few centimeters above the fretboard, your fingers should already have the shape of the chord in your hand. When you plant your fingers on the fretboard in the shape of the chord, every digit should touch the fretboard at the same time.
If they don’t, start again!
Repeat this action 5 times and strum the chord at the end of every cycle. The chord should come out clean with every note ringing true. By the fifth cycle, the movement should feel much less awkward and almost automatic. If not, continue with a few more cycles.
Remember, the key to internalising these chord shapes and building muscle memory is to GO SLOW.
This gives the brain time to analyse each movement. Soon enough the muscles are trained to grab these shapes and can be positioned on the fretboard at any moment with ease.
Exercise for the D major chord

Step 1 – Remember to hold the chord shape on the fretboard for ten seconds to really feel the shape in your fingers.
Step 2 – Bring your hand down slowly to your thigh. Bring it back up to the fretboard slowly with the shape of the D chord already formed with your fingers.
Step 3 – Repeat the cycle five times and strum the chord at the end of every cycle. Again, every note should ring clean and true. Because you’re going slow, make sure to be aware of your strumming hand.
An open D chord only contains 4 notes, starting with the open D string. Be sure that you’re not inadvertently hitting the A or E strings. Going slow like this gives you the ability to focus on your movements and play chords cleanly and precisely.
Exercise for the open G chord

Because of the wide stretch of fingers for the G chord, the low E and high E string, this chord is often difficult for beginners. If you’re struggling, take a little extra time to feel the shape in your hands.
Make sure that when you’re bringing your fingers back to the fretboard, that the shape is already formed in your fingers and no extra movements are made when placing your digits on the fretboard.
If you haven’t noticed already, these three chords, G D C, make up the ubiquitous I – IV – V – I chord progression.
You can find some variation of this progression in countless pop songs and classics like The Troggs – “Wild Thing”, Led Zeppelin – “Rock and Roll”, and most Blues songs.
Final Exercise: Playing all the chords together
Grab a metronome or use the Uberchord app’s free inbuilt metronome.
Set the metronome to 40.
Step 1 – Starting with G chord, play through the I – IV – V – I progression strumming a chord on every beat of the metronome.
This may feel painfully slow, but it will ensure you’re considering every movement. Make sure to pay attention to everything we’ve worked on. Your fingers should already be making the shape of the next chord as they leave the neck.
Step 2 – Every digit should touch down on the fretboard at the same time.
After you’re feeling more comfortable with the transitions, plug in this progression to your Uberchord. You should find that it’s much easier to play along with the progressions. Even with chords you aren’t yet comfortable with. The key to playing cleanly and precisely is training yourself to pay attention to the movement of your fingers. You’ll find that this heightened awareness translates into every new chord you learn.
As a jazz guitarist, I’ll often run into a difficult chord shape that really pushes the limits of my dexterity. This exercise really helps me to internalise the feeling of a chord and my ability to play it smoothly and seamlessly.
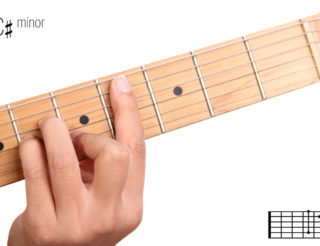
I’ll leave you with one slightly more difficult succession of chords based off the common ii – V – I progression. Utilise the exercise we just learned and see if you can navigate the chords with some fluidity and continuity.
Remember our goal is not to play a succession of difficult chords. The goal is to play music. I hope this exercise helps you take one more step in the direction of that goal.
Happy playing! We hope you’ll read more articles on our blog and continue your musical journey with us. A few of our most recent articles include amplitube app, everybody’s changing chords, and some the best guitar blogs.


Thanks for your tricks. I see Go slowly tricks very effectively.
I used to that so much when was a beginner.
Really enjoyed reading your article, and like how your exercise in smooth transitions utilizes visualization and considering each and every movement your fingers make at slow tempos. Nice work, and thank you for sharing your tips.
I’ve tried the tips discussed in this article and still can’t seem to do it. What’s the part that you aren’t telling me that will get me over the top?