

Travis Picking: A lesson in thumb control
Author: Chloe Marshall

Sometimes you’re going to find yourself without a bass player, or you might be going solo. Maybe you’ve come across a folk song you like, or maybe you’re trying out Ragtime. In any case, you’ll probably eventually encounter a technique called travis picking.
Named after the great Merle Travis, travis picking is all about using your right- hand thumb to play a steady bass pattern while your other fingers play the melody (often syncopated). It’s a fun way to become your own accompanist, but can be a hard technique to develop due to the difficulty that comes with controlling two different picking rhythms simultaneously. To make things a bit easier, this article will look at the fundamental aspects of the travis picking technique. Once you develop the basics, the rest will come together in no time!
Let’s begin with this great video introducing you Travis Picking:
The first step in getting the hang of travis picking is making sure that you have control of your thumb. By itself, the thumb movement could actually be considered quite easy since it is usually just an on-beat pluck, alternating between two or three strings. Like this:

(NB: Play each of the above notes with a downward stroke of the thumb)
Got it? Great. Now things start to get a little bit more difficult but I’ve simplified a short melody below to gradually introduce you to the idea of playing a melody over the top of this bass pattern.
For the next few exercises, you’ll notice that above the thumb pattern, there is an added melody. As you advance your travis picking technique, some songs will require you to use a specific finger for ease of play. For now, however, I’m just going to focus on making sure you’re able to keep your thumb playing at a consistent pace underneath a melody- as this is the essence of travis picking. So, feel free to play these extra little melodies with either your index, middle or ring finger- whichever feels more comfortable.
Let’s begin with something simple. For the first exercise, simply play the thumb- picking pattern you learnt earlier. Set your metronome (if you don’t have one, you can get one for free online here) to 60 BPM (Beats Per Minute) and aim to match each strike of your thumb to one metronome-click. Once you feel comfortable, use your finger to pluck the open high E-string on the second note of each bar. It should be played at the same time as the first fretted E-note of each bar (second fret, D string):
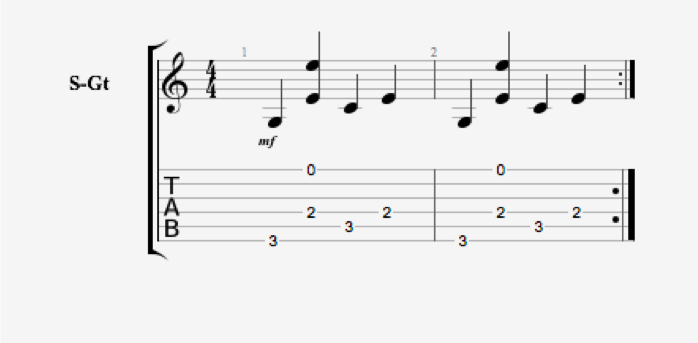
NB: Play this exercise on loop at 60BPM until you feel comfortable, then increase your metronome speed to 70BPM and try to get control of both the bass (thumb line) and melody (finger line). Do this repeatedly, increasing your metronome in gradual increments of 10 BPM until you reach 120BPM. Once you can comfortably control both your thumb and the melody at 120BPM, you’ll be ready for the next exercise.
Now drop your metronome back to 60BPM. The next exercise is similar to the first, except now you will be playing the open high E-string on the last THREE beats of each bar. Try it out:
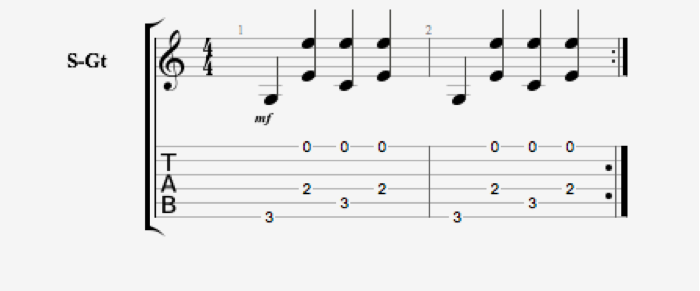
NB: Use the same practise method as before- starting at 60BPM and working up to 120BPM before moving to the next exercise.
The third exercise requires you to move your left hand a bit more to create a more coherent melody line. I’ve still kept it very simple but as you can see below, you are now required to play a G note (third fret, high E string) on the first beat of the second bar and a D note (third fret, B string) on the first beat of the fourth bar. As before, practise this with your metronome at 60BPM and work up until you can comfortably play at 120BPM.
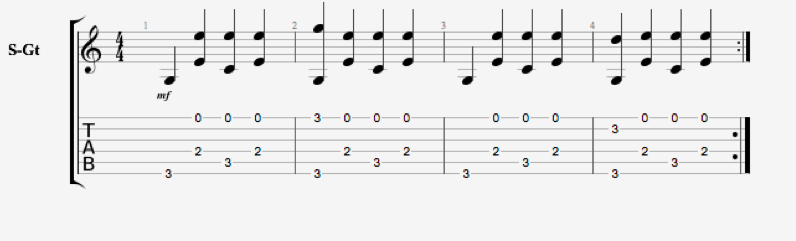
Like a challenge? Once you hit 120BPM, keep increasing the metronome in gradual increments of 10 until you reach your breaking point. Keep in mind though that the travis picking technique is typically used in folk or ragtime pieces and you would most likely be playing at speeds from 100- 150 BPM.
That was a very simplified breakdown of the travis picking technique designed for beginner guitarists to start to develop control and independence of their picking thumb. I’ll now look at a couple of song excerpts that use travis picking so that you can begin to expand on your technique.
Song Excerpt #1- Don’t Think Twice, It’s All Right- By Bob Dylan
This was a song I learnt when I was first beginning to grasp the foundations of travis picking. I’ve transcribed the introduction to the song below:
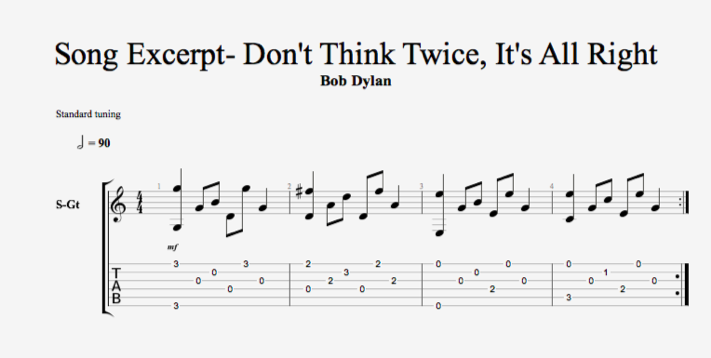
You’ll notice that this transcription is slightly more complex than the earlier exercises. The key to reading a piece like this is to pick out the bass line first. As I stated before, the bass note is typically played on every beat. If there are two notes on that beat and you aren’t sure which one to play with your thumb- pick the lower note. Once you’ve distinguished the bass line from the melody, add the melody in and get to work with your metronome to build up the tempo!
NB: Double speed- As per the tempo marking on the transcription, one half note is equal to 90BPM. This means that you should actually be playing two bass notes for every click of the metronome. Since that is significantly harder to achieve, I’d recommend starting slower at 40-50 BPM and working up to 90BPM. Alternatively, you can still play one bass note for every click of the metronome by starting at 70-80BPM and simply working up to 180BPM.
If you’re still having trouble separating the bass and melody lines, I’ve transcribed the bass part separately below. Once you get control of this, add in the top melody: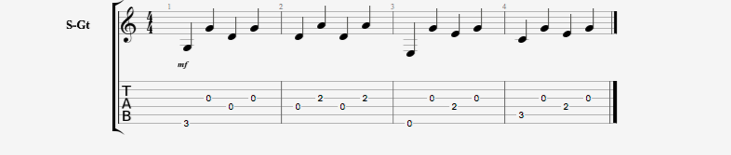
Song Excerpt #2- Freight Train
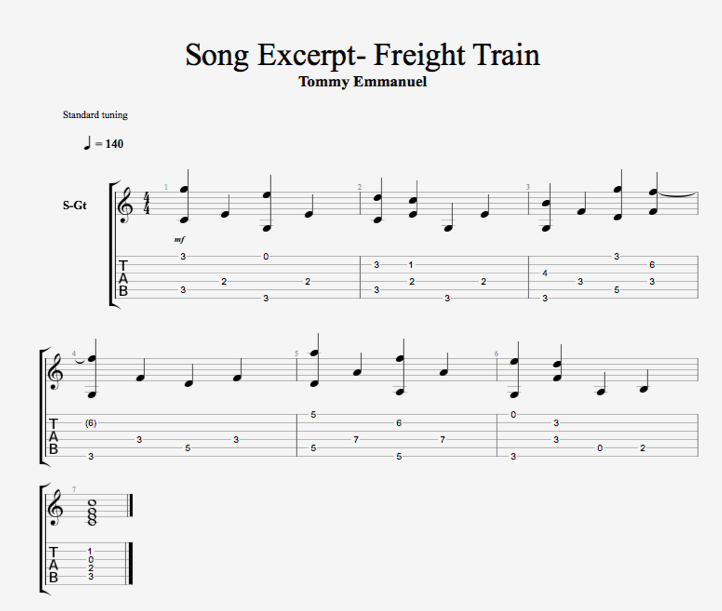
For those seeking a bit of a challenge, I’ve also transcribed the first few bars of Tommy Emmanuel’s Freight Train. This is a simplified version (without a lot of the syncopated melody). Again, if you’re struggling to read the transcription as a whole, try picking out the bass line first and practicing that. For this song, start at 80-90BPM and work up to 140BPM.
So there you have it- your thumb is starting to get under control! There are thousands of songs available on the internet that use travis picking available. So get searching, or try some of the links below:
And also be sure to browse through our blog here at Uberchord! Not only do we cover several country songs for beginners, but we can help you get some more practice using this popular picking technique. Some topics we’ve covered recently included words and chords for jingle bells, cool beginner progressive riffs, and how to get hardcore guitar tone.


Dam ur great teacher .I never learned so much in 20 mins.well done.ur my go to guy.now on. ty much..jay.b