

How To Find & Memorise The Notes On The Guitar Fretboard Like A Pro
Author: Brett Heenan
As a new guitarist, one of the most difficult endeavors is that of digesting and internalising the notes of the guitar neck. The fretboard is a complex grid that overlaps on itself and often leaves it’s handler confused and frustrated. What’s more, the neck’s uniform nature lends itself to patterns that can easily be moved around the neck without having to actually know what notes are being played.
When you start out at a slow tempo, it gives you time to think about your movements and see what’s coming ahead.
Unfortunately, this leads to many guitarists being able to play quite well but feeling boxed in by their fundamental lack of knowledge of the fretboard. Blues in A? Great. Move to the 5th fret and ready to wail. But what if you want to move out of your stock pentatonic shape and play that high E at the 12th fret? You may know a shape up in that area as well, but still you feel boxed in because the rest of the fretboard remains uncharted waters, grey and fuzzed out by a lack of fretboard knowledge and fluidity.
Technique / Exercise
This simple exercise can help you systematically break down where every note is on the fretboard and help you understand the scale patterns you already know at a much deeper and comprehensible level.
This exercise, aptly titled the Note Finder Exercise, should be attacked systematically and SLOWLY. As I’ve mentioned in other lessons and to all my students, doing exercises at a slow tempo is essential to successfully internalising the material at hand. Of course raising the tempo should happen over time, but when learning a new exercise one should always go slowly.
When you start out at a slow tempo, it gives you time to think about your movements and see what’s coming ahead. Once the process has been thought out and internalised at a slow tempo, speeding up is easy because the thought process and muscle memory are already in place.
The essential goal of this exercise is to be able to find any note on any string
Step 1: To find any note, we’ll want to map out where any single note resides on each of the six strings. To begin, we’ll first want to logically break down the fretboard and understand how it’s mapped in a standard guitar tuning.
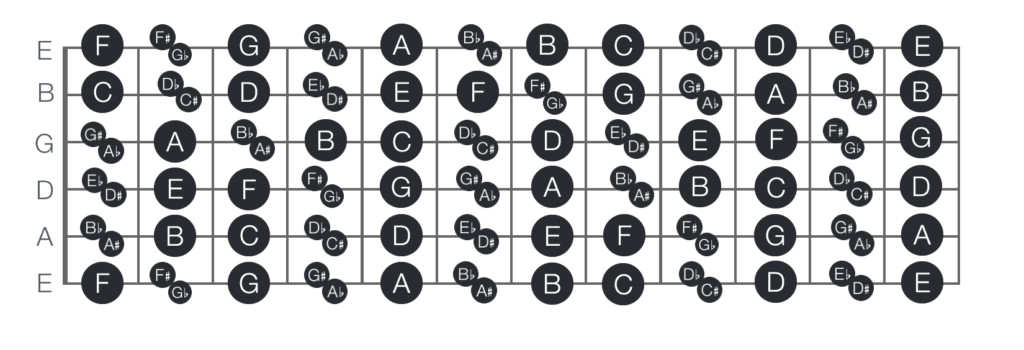
Here is a picture of a fretboard with all the notes spanning from the 1st to the 12th fret. You’ll notice that some frets have two notes on them. This is due to the fact the some notes have different names depending on the key signature.
For example, you wouldn’t want to spell out an E Major scale:
E Gb Ab A B Db Eb E
That wouldn’t be readable. Hence using different note names depending on the key.
E F# G# A B C# D# E
Much more readable.
If you’re not familiar with this, don’t worry about it too much now. Just realise that A#(sharp) and Bb(flat) are indeed the same note, etc.

Step 2: In the above diagram, the note F is highlighted on the first, second and third string. If you play these three notes, you’ll notice they are actually the exact same note in the same octave. This is what makes stringed instruments unique, but also sometimes frustrating to learn.
If you do this exercise slowly and systematically, you’ll know the fretboard in and out in no time.
On most other instruments you can only play a note in one place, but on guitar you can play the same note in several different places. What’s important to recognise here, is that the guitar is a grid that OVERLAPS on itself. If you think about F on the first fret as a starting point and play a scale going up, it’s exactly the same as starting on F on the second string 6th fret. Recognising patterns like this will help you better internalise every note’s placement on the neck.
As we’ve been discussing F, it’s a good note to start the Note Finder Exercise with. The diagram below has all the F’s below the 12th fret highlighted.
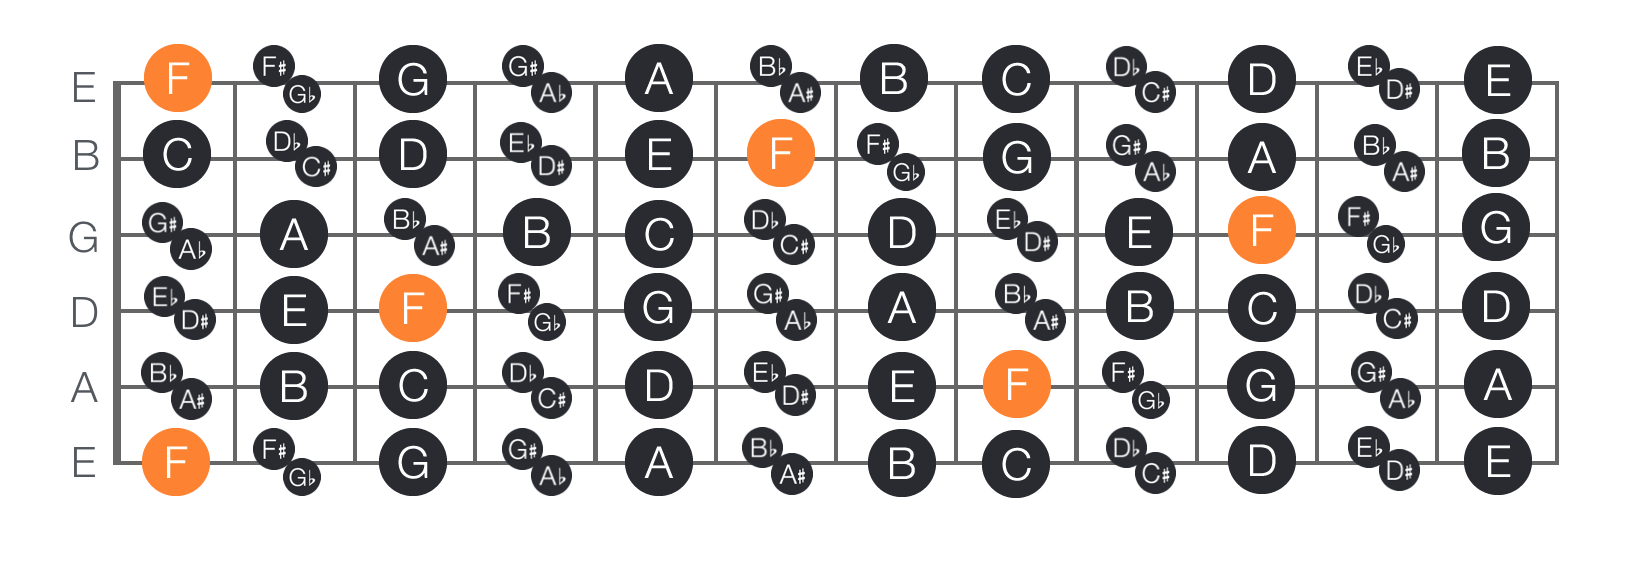
When doing this exercise, it’s important to stay below the 12th fret. The grid of the fret board repeats itself above the 12th fret so limiting yourself to notes below the 12th fret will keep you from jumping to notes in places you already know.
Step 3 – Set your metronome to 40 BPM, you can use your Uberchord app for this.

Starting on the low E string play F on every string up to the high E string. When you get to the top, come back down the string set. It will take several times to feel fluid, but soon you’ll start seeing where each F is placed on the fretboard.
Use patterns to your advantage.
You probably already know the F on the low E string from playing an F major chord. This means you already know where F is on the high E string because they’re placement is identical, just two octaves apart.
Between every string except B and G, you can go down a string and up 5 frets to find the same note (eg. F on the first fret, high E string and F on the 6th fret, B string are the same note).
Between the B and G string you would go up 4 frets with the same pattern to find the same note. This is due to the B and G string being a Major 3rd apart rather than a fourth apart (annoying, I know). Recognising patterns like these shouldn’t be used as a crutch, but they’ll help you typify the fretboard more and make every note’s placement easier to internalise.
After you’ve gotten pretty comfortable with F choose a different note. Possibly Bb, or some other note that you’re really uncomfortable with.
After enough repetition you won’t wonder where that notes placement on the neck is. Eventually you’ll want to work up playing through every note on the fretboard. Picking something like the cycle of fourths is a good place to start.
Here’s a video of the exercise in a cycle of fourths.
After you’re comfortable with going through every key, speed up the metronome. Then pick another cycling pattern. Major thirds is quite nice.
Picking new cycles helps with thinking ahead. While you’re searching for every note on the fretboard, you’re also thinking about what note to move to next. If you do this exercise slowly and systematically, you’ll know the fretboard in and out in no time. Happy playing!
Are you hungry for more free guitar lessons to practice your newfound knowledge? Then you should check out our article covering how to play like James Hetfield guitar position. If you’re into country style guitar playing, then our free lesson on the correct way to fingerpick on guitar using some typical country song chord progressions could be a big help.


Hi !
I have greatly appreciated your intro explaining why it is important to “know the fretboard” .
I wonder whether I might ask you to have a look on a “new system” to memorize the notes on the fretboard
This System is extremely performant and was made by ARGANT Yves,French guitar teacher and Luthier having invented the Multi Nick GUITAR STALLION.
It’s been downlaid into a Book containing excercices and lots of explanations on “music” itself.
It’s a new approach to the fretboard and I would be pleased to tell you more about it.
Looking forward to hearing from you soon,
Danielle ARGANT, Grenoble, France
I find it highly insulting that you don’t have an Android app. Why do companies continue to cater to Apple and neglect Android in this day and age?
I guess the bar for being “highly insulted” is pretty low these days.
Hmm nice but please your writing, it is rather confusing. For example in one segment you say “in the diagram above you can se that…” actually the diagram is not above but it is below.