

Learn Guitar Fingerpicking For Beginners: Four Basic Patterns Anyone Can Play
Author: Wanda Waterman

Ah, fingerpicking . . . The very word puts you in mind of lazy summer afternoons on the back porch or evenings around a campfire, plaid flannel shirts, Chet Atkins, organic gardening, Anaïs Mitchell, the civil rights movement, Simon and Garfunkel, thoughtful reflections on a rainy day, and so much more.
Guitar fingerpicking for beginners just means using your fingers to pluck the strings, without a pick. The style is so integral to folk music that it’s often the first choice of guitar accompaniment, but it’s also a big part of bluegrass, country music, blues, and rock, even heavy metal, and has historically been a favourite of singer-songwriters, who often find this style of playing the most appropriate for their more thoughtful work. Without fingerstyle guitar, we wouldn’t have “Take Me Home, Country Roads,” “Stairway to Heaven,” “Rhiannon,” “Hallelujah,” or a host of other classic hits.
Fingerpicking is one of the few musical techniques that’s actually fun to learn, so flowing, so calming, so Zen. Besides, the fingerpicking just seems to bring the best sound out of the guitar as an instrument.
If you’re still not sold, watch this video to get a sense of what fingerstyle guitar has meant to the history of popular music. Most of the songs in this video are combinations of different fingerpicking styles, some of which we’re going to teach you today to introduce you to guitar fingerpicking for beginners.
Guitar fingerpicking for beginners may seem awkward at first, but once your fingers are trained they’ll move with the ease and grace of trained dolphins. You’ll see a marked improvement once your fingers have internalized the style, and your playing will look artless, as it should so that you can then concentrate on your style or your singing.
The four fingerpicking styles below, along with their variations, will open the door, giving you a foundation for learning more styles later. You don’t have to play chords while you’re figuring these out, but if you do want to use chords we recommend using chords with as few mute strings as possible, like G major, E minor, and E major. This will make learning simpler, and once you have the patterns down you can try them with the other chords.
For this article, we’re going to be numbering the strings according to the Cipher system, which is more intuitive than the way your guitar strings are numbered when you buy them. Thus the strings are numbered like this:
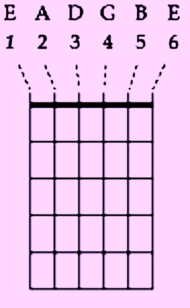
There is no “right” way to play the patterns below; they’re simply indications of how to fingerpick, and you’re completely free to mix them up, switch strings around an alternate to your heart’s delight. We’re not even going to tell you which fingers to use for which strings; use the fingers that feel most comfortable to you but just remember to save your thumb for the bass strings.
It will be easier if you position your fingers on the strings that those fingers will be plucking. This will help your fingers to get used to staying close to those strings until they’re needed.
With guitar fingerpicking for beginners, the thumb is usually poised to strike any of the first three (bass) strings while the three fingers are poised to strike strings three to six. You can also strike all three of the higher strings at once, like Joni Mitchell, Tracy Chapman, and so many other singer-songwriters have done.
The first two patterns are fairly easy, but the third and fourth will take a little longer to learn so be kind to yourself and give yourself time. Though they look hard now, once you’ve learned them, playing them will be practically effortless.
If you’re still not used to guitar fingerpicking for beginners after this lesson, then read this guide too best way to practice guitar. Fingerpicking is bound to feel abnormal to many people who’ve never done this before. That’s why having a great practice routine like the ones we describe in that article will help. Now, on to the patterns!
Table of Contents
1. The Basic (One-Four-Five-Six)
Pluck the first string with your thumb, then the fourth string with your forefinger, the fifth string with your second finger, and the highest note of the chord with your third finger. Repeat ad infinitum.
You can play this style with any songs in 2/4 or 4/4 time.
Variation: Alternate which bass notes you play with your thumb. You can also play it backward, starting with the sixth string, to sound like part of the intro to “Stairway to Heaven.”
2. The Rising Sun (One-Four-Five-Six-Five-Four)
This style is for those songs in 3/4 time that we find so often in folk music, and sometimes in rock where it becomes 2/4 (two main beats, but each divided into three shorter beats). “House of the Rising Sun,” “In the Pines,” and “Nothing Else Matters” by Metallica are a few examples of songs that use this pattern.
Do exactly what we said in the basic pattern, but after you hit the sixth string with your third finger, reverse direction, once more picking the fifth string with your second finger and then the fourth string with your forefinger.
Variations: With this pattern, you can also alternate which bass notes you play with your thumb.
Another variation is to insert a rapid run (with thumb plus forefinger and second finger) of the in-between strings before you hit the sixth string and then reverse. For an example of how this sounds to listen to the Animals playing “House of the Rising Sun.”
3. The Suzanne
This pattern is so named because it’s very similar to the pattern you hear at the beginning of Leonard Cohen’s song “Suzanne.”
Pluck the third and fifth strings at the same time with your thumb and the second finger, then pluck the third string. Then pluck the second and sixth strings at the same time with your thumb and second finger, and pluck the third string again. Repeat.
Note: Although this pattern has a charming sound and makes for a great intro, as in the “Sound of Silence” by Simon and Garfunkel, it’s a little monotonous for a whole song and is usually used to create variety or emotion along with another fingerpicking style. It will also prepare you to learn the next pattern.
4. The Blackbird (One and Six, then Two-Five-One Six-Three)
Yes, this is named after the song by the Beatles that uses it (it can also be heard in “Dust in the Wind” by Kansas). The simplest way to explain this is once more to name the strings in the order in which they’re plucked.
Here is the order in which you pluck the strings: one and six together, two, five, one, six, three (1+6-2-5-1-6-3). Which fingers you use is not of primary concern, but it’s essential, to get the motion right, that the first note and every second note after that be made with your thumb, which alternates between the three bass notes.
Once you get this down you don’t have to be quite so strict about which strings you hit– the important thing is developing the ease with that up-down motion between your thumb and your fingers.
––––––––––––––––––––––––––––––––––––––––––––––
Once you’ve grasped how to play these patterns you can start using chords, bringing in your Uberchord app to tweak your style until it’s clean. After that, you can work on playing with style and feeling to make your playing unforgettable. (For more on that check out our article 8 Enlightening Zen Teachings to Master the Art of Guitar).
If you want to continue with guitar fingerpicking for beginners your next step will be to learn new patterns and how to combine them, as well as how to pick out the melody while you’re playing. If you listen to great fingerpickers it will often sound as if two guitars are playing– one playing the melody and the other accompanying. It’s not as impossible as it sounds, and all it takes is dedication and practice. Keep at it, and don’t forget that we’re behind you!


This is so great. Thank you and God bless you guys at Uberchord.
I want to learn guitar, I’ll be back with later, Thank you. Nancy Parks